해당 내용은 T1012 스터디에 나온 내용과 '테라폼으로 시작하는 IaC' 책을 기준으로 정리 했습니다
사전구성
[T1012] 1주차 - 테라폼 기본 사용 1/2 (환경구성)
해당 내용은 T1012 스터디에 나온 내용과 '테라폼으로 시작하는 IaC' 책을 기준으로 정리 했습니다 [1. 개요] 첫 스터디 참여 테라폼 설치와, 기본 사용에 대하여 정리 [2. 사전준비] 실행환경 Windows 1
portnumber.tistory.com
HCL 이란?
HCL HashiCorp configuration language은 하시코프사에서 IaC와 구성 정보를 명시하기 위해 개발된 오픈 소스 도구
실습환경
# workspaces 폴더 생성 후 이동
mkdir workspaces
cd workspaces

# 03.start 폴더 생성 후 이동
mkdir 03.start
cd 03.start

# 실행 환경은 Terraform 1.5.2 버전 입니다
kkyoung@DESKTOP-26MI22N:/mnt/d/study/workspaces/03.start$ terraform --version
Terraform v1.5.2
on linux_amd64
+ provider registry.terraform.io/hashicorp/local v2.4.0
주요 커맨드
# main.tf 파일을 생성 후 다음과 같이 입력
vi main.tf
---
resource "local_file" "abc" {
  content  = "abc!"
  filename = "${path.module}/abc.txt"
}
---
terraform init
Command: init | Terraform | HashiCorp Developer
The terraform init command initializes a working directory containing configuration files and installs plugins for required providers.
developer.hashicorp.com
terraform init 명령은 Terraform 구성 파일이 포함된 작업 디렉터리를 초기화합니다.
이것은 새 Terraform 구성을 작성하거나 버전 제어에서 기존 구성을 복제한 후 실행해야 하는 첫 번째 명령입니다.
kkyoung@DESKTOP-26MI22N:/mnt/d/study/workspaces/03.start$ terraform init
Initializing the backend...
Initializing provider plugins...
- Finding latest version of hashicorp/local...
- Installing hashicorp/local v2.4.0...
- Installed hashicorp/local v2.4.0 (signed by HashiCorp)
Terraform has created a lock file .terraform.lock.hcl to record the provider
selections it made above. Include this file in your version control repository
so that Terraform can guarantee to make the same selections by default when
you run "terraform init" in the future.
Terraform has been successfully initialized!
You may now begin working with Terraform. Try running "terraform plan" to see
any changes that are required for your infrastructure. All Terraform commands
should now work.
If you ever set or change modules or backend configuration for Terraform,
rerun this command to reinitialize your working directory. If you forget, other
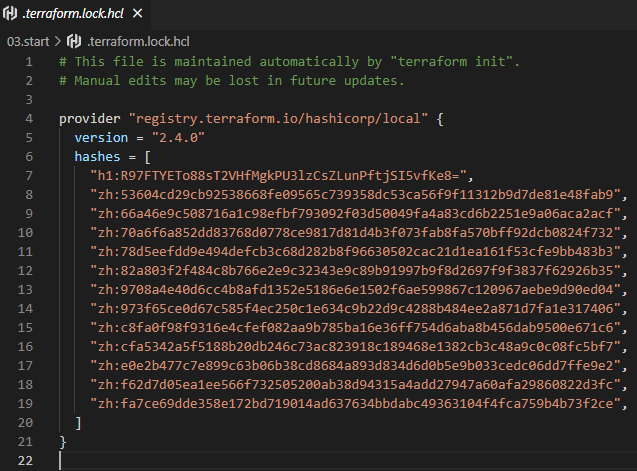
commands will detect it and remind you to do so if necessary.이런 파일이 생성됩니다.

.terraform.lock.hcl 파일에는 다음과 같이 버전 지정이 되어 있습니다
terraform plan
Command: plan | Terraform | HashiCorp Developer
The terraform plan command creates an execution plan with a preview of the changes that Terraform will make to your infrastructure.
developer.hashicorp.com
terraform plan 명령은 Terraform이 인프라에 적용할 계획인 변경 사항을 미리 볼 수 있는 실행 계획을 생성합니다.
추가로 -out 옵션을 통해 plan을 바이너리 형태로 추출 가능합니다
해당 tf 파일을 통해 어떤식으로 동작할지 plan을 보여줍니다
kkyoung@DESKTOP-26MI22N:/mnt/d/study/workspaces/03.start$ terraform plan

Terraform used the selected providers to generate the following execution plan. Resource actions are indicated with the following symbols:
  + create

Terraform will perform the following actions:

  # local_file.abc will be created
  + resource "local_file" "abc" {
      + content              = "123!"
      + content_base64sha256 = (known after apply)
      + content_base64sha512 = (known after apply)
      + content_md5          = (known after apply)
      + content_sha1         = (known after apply)
      + content_sha256       = (known after apply)
      + content_sha512       = (known after apply)
      + directory_permission = "0777"
      + file_permission      = "0777"
      + filename             = "./abc.txt"
      + id                   = (known after apply)
    }

Plan: 1 to add, 0 to change, 0 to destroy.

──────────────────────────────────────────────────────────────────────────────────────────────────────────────────────────────────────────────────────────────────────────────────────────

Note: You didn't use the -out option to save this plan, so Terraform can't guarantee to take exactly these actions if you run "terraform apply" now.
terraform apply
Command: apply | Terraform | HashiCorp Developer
The terraform apply command executes the actions proposed in a Terraform plan to create, update, or destroy infrastructure.
developer.hashicorp.com
terraform apply 명령은 Terraform 계획에서 제안된 작업을 실행합니다.
plan 과정을 보여준뒤 작업 실행 여부를 물어봅니다.
plan 으로 생성한 바이너리가 있다면 terraform apply {바이너리} 로 실행해도 됩니다.
추가로 작업 확인절차 없이 실행하고 싶다면 -auto-approve 옵션을 추가 해주면 됩니다.
kkyoung@DESKTOP-26MI22N:/mnt/d/study/workspaces/03.start$ terraform apply

Terraform used the selected providers to generate the following execution plan. Resource actions are indicated with the following symbols:
  + create

Terraform will perform the following actions:

  # local_file.abc will be created
  + resource "local_file" "abc" {
      + content              = "123!"
      + content_base64sha256 = (known after apply)
      + content_base64sha512 = (known after apply)
      + content_md5          = (known after apply)
      + content_sha1         = (known after apply)
      + content_sha256       = (known after apply)
      + content_sha512       = (known after apply)
      + directory_permission = "0777"
      + file_permission      = "0777"
      + filename             = "./abc.txt"
      + id                   = (known after apply)
    }

Plan: 1 to add, 0 to change, 0 to destroy.

Do you want to perform these actions?
  Terraform will perform the actions described above.
  Only 'yes' will be accepted to approve.

  Enter a value: yes

local_file.abc: Creating...
local_file.abc: Creation complete after 0s [id=5f30576af23a25b7f44fa7f5fdf70325ee389155]

Apply complete! Resources: 1 added, 0 changed, 0 destroyed.
terraform destroy
Command: destroy | Terraform | HashiCorp Developer
The terraform destroy command destroys all objects managed by a Terraform configuration.
developer.hashicorp.com
terraform destroy 명령은 특정 Terraform 구성에서 관리하는 모든 원격 객체를 삭제하는 편리한 방법입니다.
apply와 비슷하게 과정을 보여준뒤 작업 실행 여부를 물어봅니다.
이것 역시 추가로 작업 확인절차 없이 실행하고 싶다면 -auto-approve 옵션을 추가 해주면 됩니다.
kkyoung@DESKTOP-26MI22N:/mnt/d/study/workspaces/03.start$ terraform destroy
local_file.abc: Refreshing state... [id=5f30576af23a25b7f44fa7f5fdf70325ee389155]

Terraform used the selected providers to generate the following execution plan. Resource actions are indicated with the following symbols:
  - destroy

Terraform will perform the following actions:

  # local_file.abc will be destroyed
  - resource "local_file" "abc" {
      - content              = "123!" -> null
      - content_base64sha256 = "WMxIBYDzArMayMQtRw31w8x6vsNdmQmCiKWjrDtWpEk=" -> null
      - content_base64sha512 = "p6QsIyFZOgy9Ax+11AnGnnPkYmKvSBMhiAXO3gBcOPQq+A7LWKNmkCaQSScREaBbGh8hxqwIBr+9HspW+BOU2w==" -> null
      - content_md5          = "0610a910e9cd7ec9f78b7e3f4d959e6f" -> null
      - content_sha1         = "5f30576af23a25b7f44fa7f5fdf70325ee389155" -> null
      - content_sha256       = "58cc480580f302b31ac8c42d470df5c3cc7abec35d99098288a5a3ac3b56a449" -> null
      - content_sha512       = "a7a42c2321593a0cbd031fb5d409c69e73e46262af4813218805cede005c38f42af80ecb58a36690269049271111a05b1a1f21c6ac0806bfbd1eca56f81394db" -> null
      - directory_permission = "0777" -> null
      - file_permission      = "0777" -> null
      - filename             = "./abc.txt" -> null
      - id                   = "5f30576af23a25b7f44fa7f5fdf70325ee389155" -> null
    }

Plan: 0 to add, 0 to change, 1 to destroy.

Do you really want to destroy all resources?
  Terraform will destroy all your managed infrastructure, as shown above.
  There is no undo. Only 'yes' will be accepted to confirm.

  Enter a value: yes

local_file.abc: Destroying... [id=5f30576af23a25b7f44fa7f5fdf70325ee389155]
local_file.abc: Destruction complete after 0s

Destroy complete! Resources: 1 destroyed.
terraform init 을 하지 않고 바로 plan 이나 apply 를 하게 된다면?
다음과 같은 오류가 발생한다!
kkyoung@DESKTOP-26MI22N:/mnt/d/study/workspaces/03.start$ terraform plan
╷
│ Error: Inconsistent dependency lock file
│
│ The following dependency selections recorded in the lock file are inconsistent with the current configuration:
│   - provider registry.terraform.io/hashicorp/local: required by this configuration but no version is selected
│
│ To make the initial dependency selections that will initialize the dependency lock file, run:
│   terraform init
╵
테라폼 블록
테라폼 블록 이란 테라폼 구성을 명시하는 데 사용
사용하지 않으면 자신의 환경에 맞게 실행 되지만, 팀단위 사용을 위해 테라폼 버전이나 프로바이더 버전을 지정하길 권장
terraform {
  required_version = "~> 1.3.0" # 테라폼 버전

  required_providers { # 프로바이더 버전을 나열
    random = {
      version = ">= 3.0.0, < 3.1.0"
    }
    aws = {
      version = "4.2.0"
    }
  }
}
그럼 어떻게 쓰는걸까?
다음은 실행한 위치에 abc! 라는 내용이 있는 abc.txt 파일을 생성하라는 main.tf 입니다.
# 03.start 라는 폴더를 만든뒤 이동 하겠습니다
mkdir 03.start
cd 03.start

# 실행 환경은 Terraform 1.5.2 버전 입니다
kkyoung@DESKTOP-26MI22N:/mnt/d/study/workspaces/03.start$ terraform --version
Terraform v1.5.2
on linux_amd64
+ provider registry.terraform.io/hashicorp/local v2.4.0


# main.tf 파일을 생성 후 다음과 같이 입력
vi main.tf
---
resource "local_file" "abc" {
  content  = "abc!"
  filename = "${path.module}/abc.txt"
}
---

# 초기화
terraform init

# 반영
terraform apply

Terraform used the selected providers to generate the following execution plan. Resource actions are indicated with the following symbols:
  + create

Terraform will perform the following actions:

  # local_file.abc will be created
  + resource "local_file" "abc" {
      + content              = "123!"
      + content_base64sha256 = (known after apply)
      + content_base64sha512 = (known after apply)
      + content_md5          = (known after apply)
      + content_sha1         = (known after apply)
      + content_sha256       = (known after apply)
      + content_sha512       = (known after apply)
      + directory_permission = "0777"
      + file_permission      = "0777"
      + filename             = "./abc.txt"
      + id                   = (known after apply)
    }

Plan: 1 to add, 0 to change, 0 to destroy.

Do you want to perform these actions?
  Terraform will perform the actions described above.
  Only 'yes' will be accepted to approve.

  Enter a value: yes

local_file.abc: Creating...
local_file.abc: Creation complete after 0s [id=5f30576af23a25b7f44fa7f5fdf70325ee389155]

Apply complete! Resources: 1 added, 0 changed, 0 destroyed.
kkyoung@DESKTOP-26MI22N:/mnt/d/study/workspaces/03.start$ cat abc.txt
123!
결과는 다음과 같을때

main.tf 를 다음과 같이 수정
vi main.tf
---
terraform {
  required_version = "< 1.0.0"
}

resource "local_file" "abc" {
  content  = "abc!"
  filename = "${path.module}/abc.txt"
}
---
결과는 다음과 같습니다
kkyoung@DESKTOP-26MI22N:/mnt/d/study/workspaces/03.start$ terraform plan
╷
│ Error: Unsupported Terraform Core version
│
│   on main.tf line 2, in terraform:
│    2:   required_version = "< 1.0.0"
│
│ This configuration does not support Terraform version 1.5.2. To proceed, either choose another supported Terraform version or update this version constraint. Version constraints are normally set for good reason, so
│ updating the constraint may lead to other errors or unexpected behavior.
╵
조건으로 1.0.0 미만의 버전만 가능합니다
반대로 1.0.0 이상 이거나 특정 버전을 지정하면 지금 사용하는 버전을 지정하여 실행시킬수 있습니다
terraform {
  required_version = ">= 1.0.0"
  # required_version = ">= 1.5.2"
}

resource "local_file" "abc" {
  content  = "123!"
  filename = "${path.module}/abc.txt"
}
백엔드 블록
백엔드 블록은 테라폼 실행시 저장되는 state의 저장 위치를 선언하고
state의 데이터를 사용해 코드로 관리된 리소스를 탐색하고 추적 할수 있다
state를 보기위해 terraform apply를 실행 해봅니다
kkyoung@DESKTOP-26MI22N:/mnt/d/study/workspaces/03.start$ terraform apply

Terraform used the selected providers to generate the following execution plan. Resource actions are indicated with the following symbols:
  + create

Terraform will perform the following actions:

  # local_file.abc will be created
  + resource "local_file" "abc" {
      + content              = "123!"
      + content_base64sha256 = (known after apply)
      + content_base64sha512 = (known after apply)
      + content_md5          = (known after apply)
      + content_sha1         = (known after apply)
      + content_sha256       = (known after apply)
      + content_sha512       = (known after apply)
      + directory_permission = "0777"
      + file_permission      = "0777"
      + filename             = "./abc.txt"
      + id                   = (known after apply)
    }

Plan: 1 to add, 0 to change, 0 to destroy.

Do you want to perform these actions?
  Terraform will perform the actions described above.
  Only 'yes' will be accepted to approve.

  Enter a value:
.terraform.tfstate.lock.info 라는 파일이 생성되었음을 확인할수 있는데
이는 state를 동시에 사용하지 못하도록 잠금처리 하기 위해 만들어진 파일 입니다

jq를 통해 보기좋게 출력해보면 다음과 같습니다
kkyoung@DESKTOP-26MI22N:/mnt/d/study/workspaces/03.start$ cat .terraform.tfstate.lock.info  | jq
{
  "ID": "2a5c860a-dd38-095d-255c-d03190fcd24e",
  "Operation": "OperationTypeApply",          # 어떤 방식으로 잠금 파일이 생성되었는지
  "Info": "",
  "Who": "kkyoung@DESKTOP-26MI22N",           # 작업자 정보, 컴퓨터 이름
  "Version": "1.5.2",                         # 실행한 테라폼 버전
  "Created": "2023-07-07T06:47:58.3924562Z",
  "Path": "terraform.tfstate"                 # 잠긴 state 파일의 위치
}
그러면... apply 중에 다른 터미널에서 또 terraform apply를 실행할경우?
kkyoung@DESKTOP-26MI22N:/mnt/d/study/workspaces/03.start$ terraform apply
╷
│ Error: Error acquiring the state lock
│
│ Error message: resource temporarily unavailable
│ Lock Info:
│   ID:        2a5c860a-dd38-095d-255c-d03190fcd24e
│   Path:      terraform.tfstate
│   Operation: OperationTypeApply
│   Who:       kkyoung@DESKTOP-26MI22N
│   Version:   1.5.2
│   Created:   2023-07-07 06:47:58.3924562 +0000 UTC
│   Info:
│
│
│ Terraform acquires a state lock to protect the state from being written
│ by multiple users at the same time. Please resolve the issue above and try
│ again. For most commands, you can disable locking with the "-lock=false"
│ flag, but this is not recommended.
╵
위와 같이 오류가 발생한다
이번에는 컨텐츠 내용을 123! 에서 123456! 으로 변경
terraform {
  required_version = ">= 1.5.2"
}

resource "local_file" "abc" {
  content  = "123456!"
  filename = "${path.module}/abc.txt"
}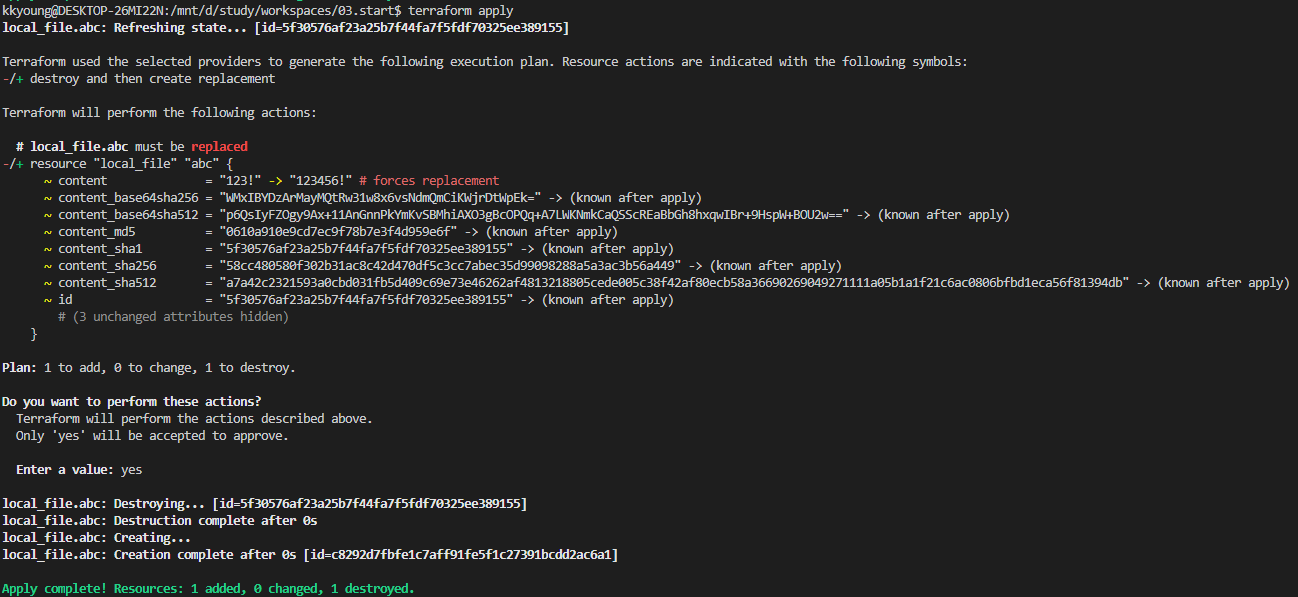
그러면 작업 내용에 대해 출력이 되는데
+ create 였던것이 -/+ destroy and then create replacement 로 바뀌었으며
암호화? 되어있던 content들의 내용도 바뀌었다...
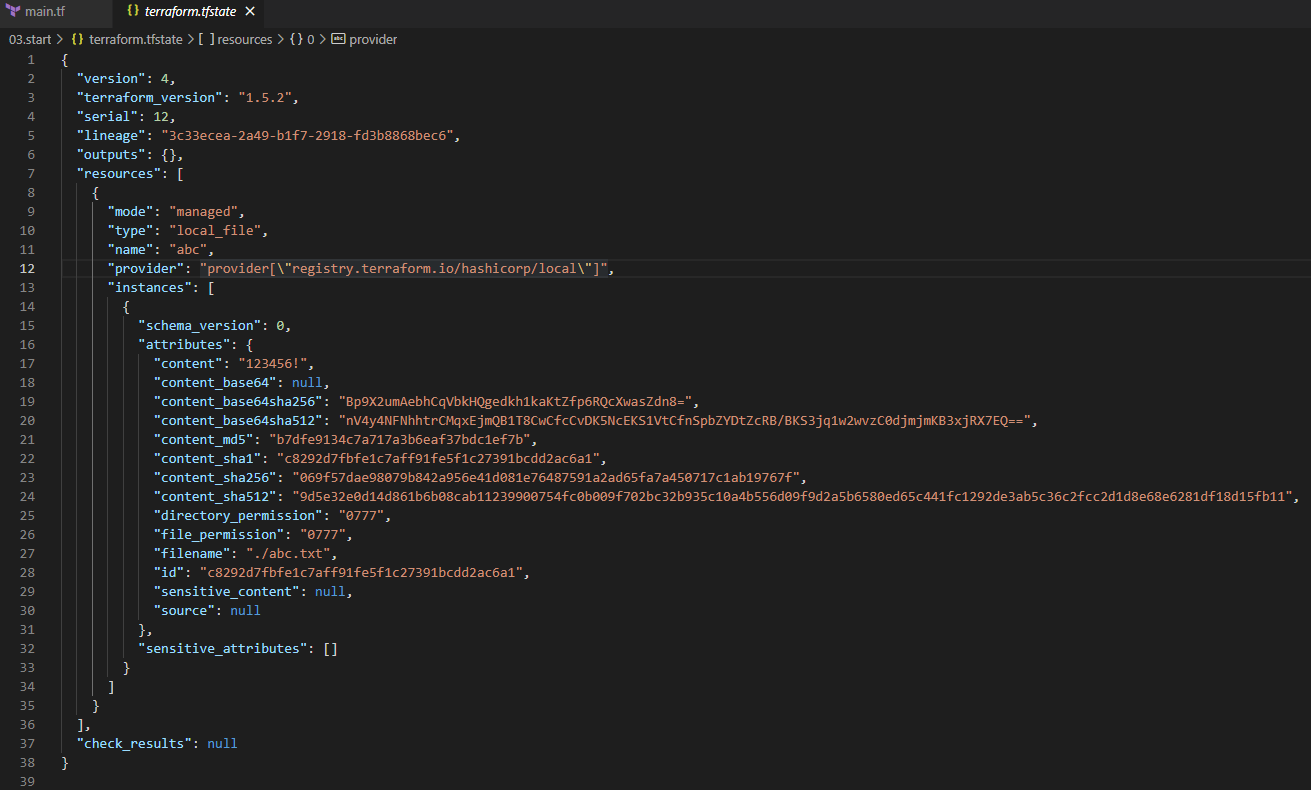

이 파일들을 확인 함으로써 (terraform.tfstate, terraform.tfstate.backup)
현재의 state와 이전 내용의 state를 확인할수 있게 된다
리소스
리소스 형식
resource "<리소스 유형>" "<이름>" {
  <인수> = <값>
}

# 예시
resource "local_file" "abc" {
  content  = "123456!"
  filename = "${path.module}/abc.txt"
}

# 프로바이더 별 리소스 유형에 따른 표시 (ex. aws_instance 리스소)

resource "aws_instance" "web" {
  ami = "ami-a1b2c3d4"
  instance_type = "t2.micro"
}
리소스 의존성
리소스를 통해 만들다 보면
사전 작업이 필요할때가 있는데, 그걸 위해 순서를 설정할수 있다
테스트를 위해 main.tf를 생성
resource "local_file" "abc" {
  content  = "123!"
  filename = "${path.module}/abc.txt"
}

resource "local_file" "def" {
  content  = "456!"
  filename = "${path.module}/def.txt"
}
terraform init
terraform apply 을 순차적으로 진행하여 나온 결과는 다음과 같다

그 뒤에 terraform graph 라는 명령을 한번 사용 해봅니다.
cli 형식으로 출력만 해주고 그래프로 보여주진 않습니다.
kkyoung@DESKTOP-26MI22N:/mnt/d/study/workspaces/03.start$ terraform graph
digraph {
        compound = "true"
        newrank = "true"
        subgraph "root" {
                "[root] local_file.abc (expand)" [label = "local_file.abc", shape = "box"]
                "[root] local_file.def (expand)" [label = "local_file.def", shape = "box"]
                "[root] provider[\"registry.terraform.io/hashicorp/local\"]" [label = "provider[\"registry.terraform.io/hashicorp/local\"]", shape = "diamond"]
                "[root] local_file.abc (expand)" -> "[root] provider[\"registry.terraform.io/hashicorp/local\"]"
                "[root] local_file.def (expand)" -> "[root] provider[\"registry.terraform.io/hashicorp/local\"]"
                "[root] provider[\"registry.terraform.io/hashicorp/local\"] (close)" -> "[root] local_file.abc (expand)"
                "[root] provider[\"registry.terraform.io/hashicorp/local\"] (close)" -> "[root] local_file.def (expand)"
                "[root] root" -> "[root] provider[\"registry.terraform.io/hashicorp/local\"] (close)"
        }
}
이렇게 출력된 내용을 파일로 저장하겠습니다.
terraform graph > graph-1.dot원하는대로 파일이 저장되었고 오른쪽 상단에 조그만하게 "DOT" 라는 아이콘이 보입니다.

누르면 다음과 같이 오른쪽에 다이아그램 형식의 사진이 뜹니다
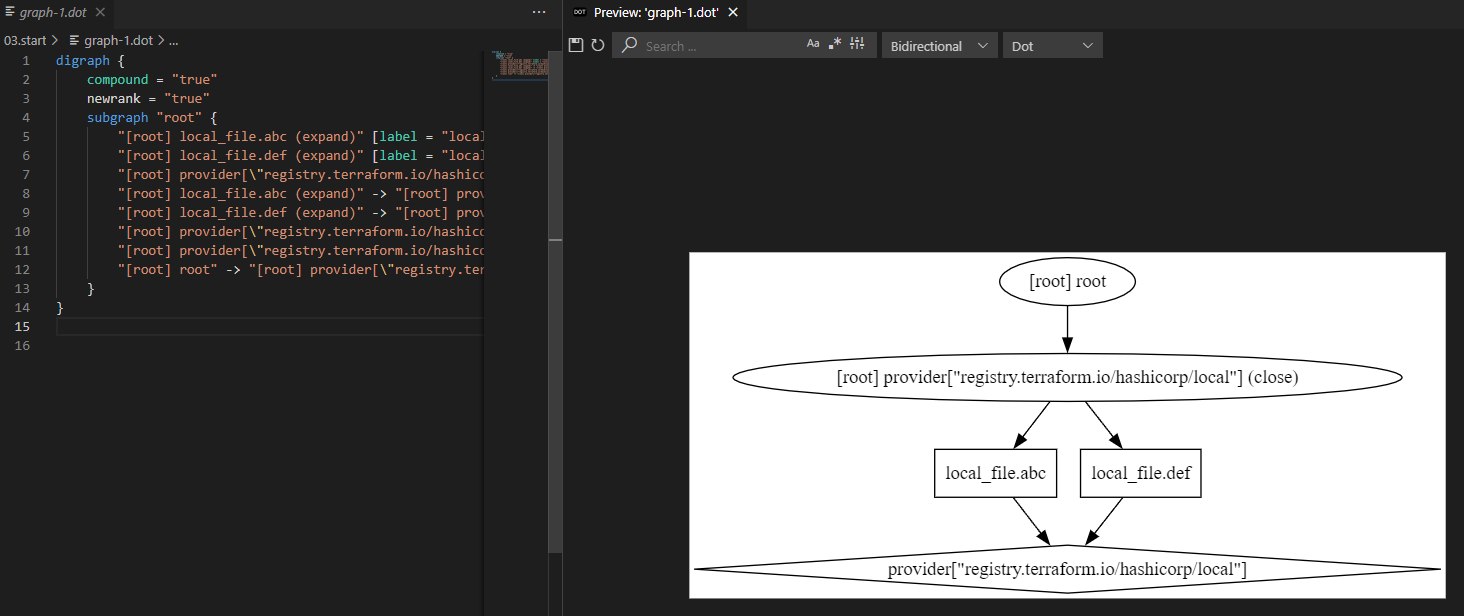
이 사진으로 봤을때는 local_file 리소스의 abc 와 def는 의존성과 별개로 동일한 위치에 있음을 알수 있습니다
이번에는 abc의 내용을 def가 참조할수 있게 main.tf를 변경하겠습니다
resource "local_file" "abc" {
  content  = "123!"
  filename = "${path.module}/abc.txt"
}

resource "local_file" "def" {
  content  = local_file.abc.content
  filename = "${path.module}/def.txt"
}
def의 내용을 보면 content에 local_file.abc의 content를 def의 content로 사용한다고 수정 했습니다.
이후 terraform graph > graph-2.dot 으로 새로운 graph를 저장 합니다.

처음에 만든 graph-1.dot 과는 다르게 동일한 위치는 아니지만
왜 local_file.def 가 먼저 왔을까? abc 먼저 생성하고 def를 생성하면 되는것 아닌가? 라는 의심이 들었는데
나는 docker 명령을 사용할때 docker rm `docker stop 컨테이너` 방식으로 많이 삭제 하면서
동일한 느낌으로 def 호출했지만 def를 만들기 위해 abc를 만들고 def를 생성한다 는 느낌으로 보였다...

위처럼 다른 리소스의 속성을 참조 하여 암시적 종속성을 부여할수 있고
depends_on 을 이용하여 종속성을 부여할수 있다
resource "local_file" "abc" {
  content  = "123!"
  filename = "${path.module}/abc.txt"
}

resource "local_file" "def" {
  depends_on = [
    local_file.abc
  ]

  content  = "456!"
  filename = "${path.module}/def.txt"
}
이후 terraform graph > graph-3.dot 으로 새로운 graph를 저장 합니다.
이건 좀 다르게 출력되겠지??
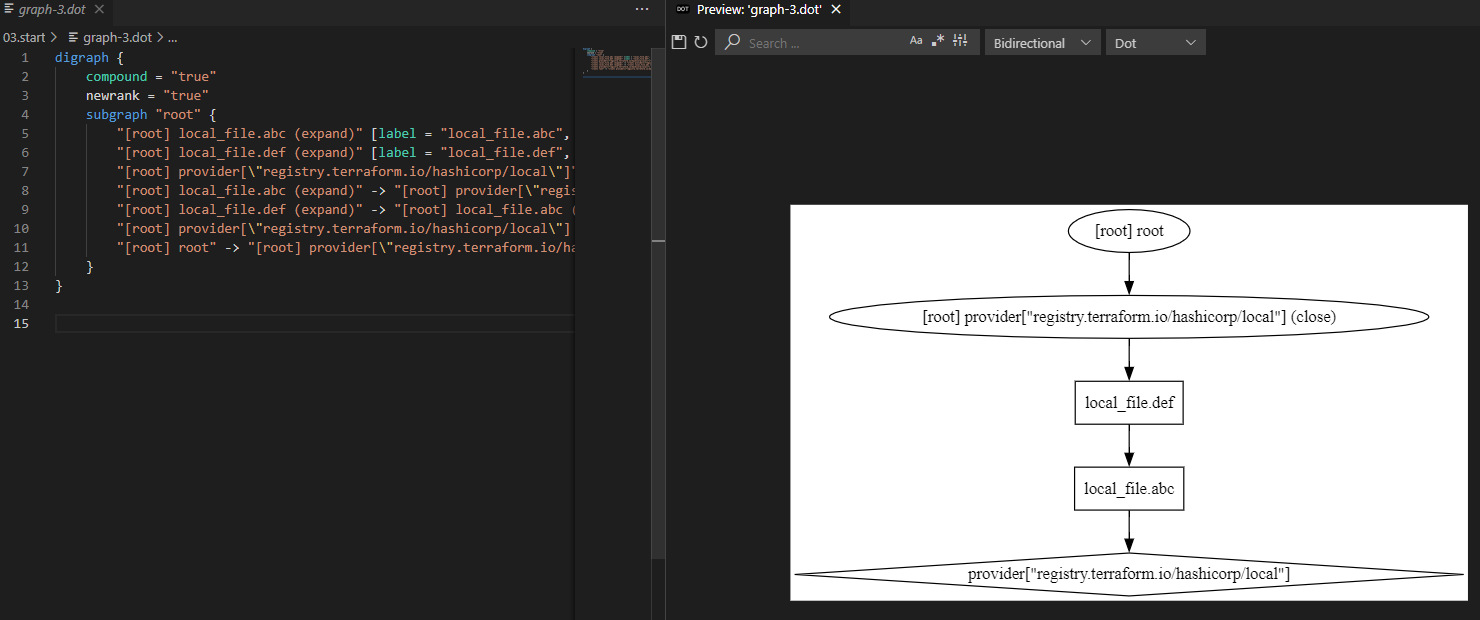
하지만 내 예상과 달리 graph-2.dot 와 동일하게 출력되는 모습을 볼수 있었다.
리소스 수명주기
The lifecycle Meta-Argument - Configuration Language | Terraform | HashiCorp Developer
The meta-arguments in a lifecycle block allow you to customize resource behavior.
developer.hashicorp.com
lifecycle은 기본 수명주기를 작업자가 의도적으로 변경하는 메타인수
예시로
리소스가 변경되었을 경우 기본 수명주기는 "삭제 후 생성" 이지만 작업자가 의도적으로 수정된 리소스를 먼저 생성 하길 원할수도 있다 그러기 위해 create_before_destroy 를 true로 선언하면 생성후 삭제로 동작하게 되는데...
수정 전에 있던 리소스가 삭제되지 않았기 때문에
수정 후 변경된 리소스가 생성 실패된다거나, 함께 삭제가 될수 있다!
resource "local_file" "abc" {
  content  = "lifecycle - step 1"
  filename = "${path.module}/abc.txt"

  lifecycle {
    create_before_destroy = false
  }
}
lifecycle 란에 create_before_destroy 를 false로 설정 했습니다 (기본 수명주기)
그리고 terraform plan && terraform apply -auto-approve
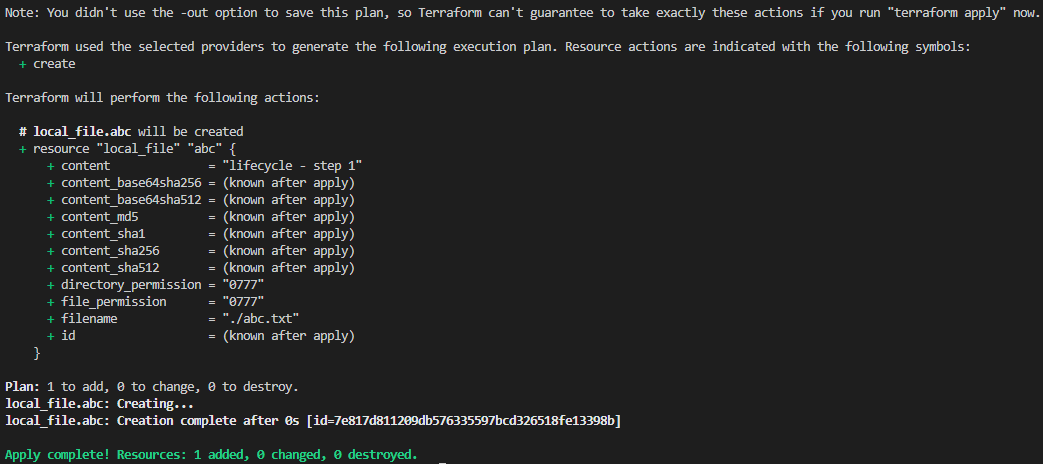
create로 abc.txt가 잘 생성 되었습니다

다시 수정합니다
resource "local_file" "abc" {
  content  = "lifecycle - step 1111111111111111"
  filename = "${path.module}/abc.txt"

  lifecycle {
    create_before_destroy = false
  }
}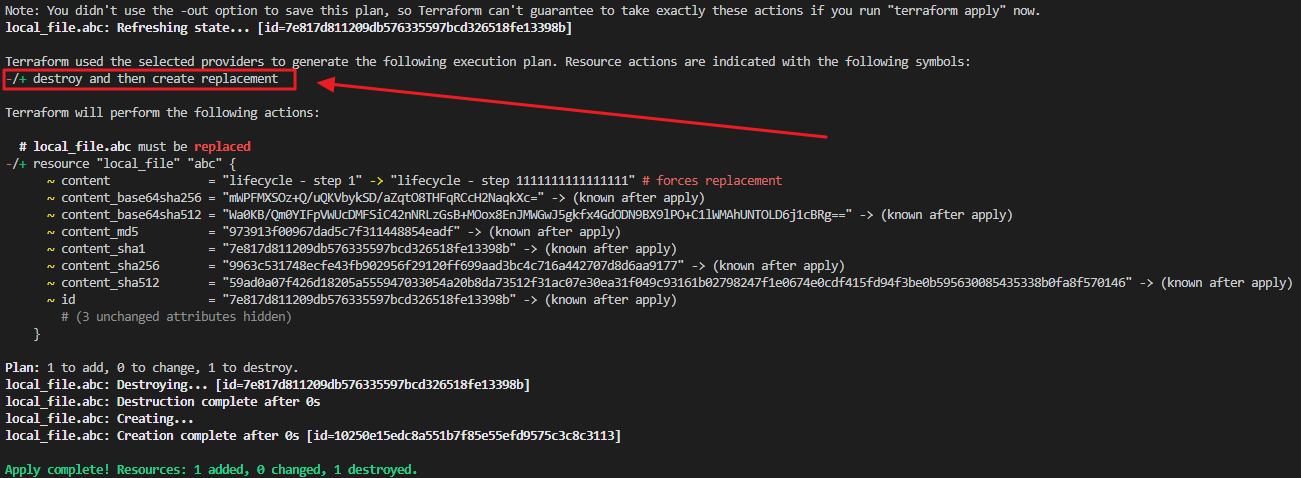
이번에는 수정사항이 발생했으니 destroy and then create replacement (삭제하고 생성) 으로 진행되었습니다
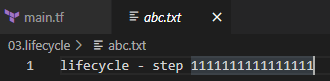
파일을 확인하여 잘 반영되었음을 알수 있습니다.
이번에는 create_before_destroy 를 true로 변경하여 진행 해보겠습니다
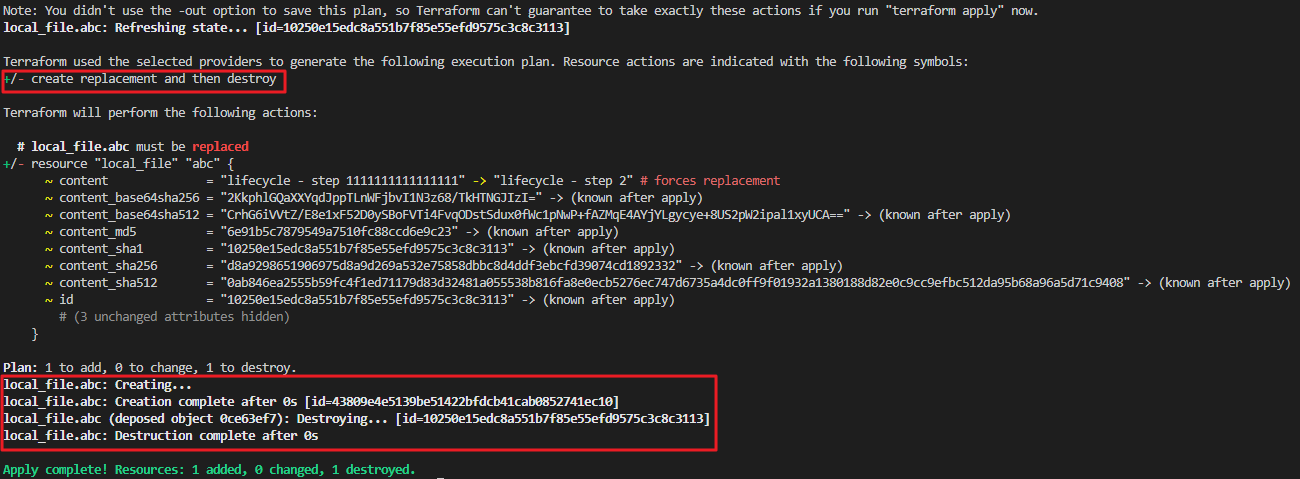
원하는데로 create replacement and then destroy (생성후 삭제) 를 했습니다...
그리고 abc.txt도 삭제되었습니다...
실무에서 경험하면 완전 식은땀 흐르겠네요

다음은 삭제를 방지하는 옵션 입니다
prevent_destroy 를 true로 전환하여 사용할수 있습니다
resource "local_file" "abc" {
  content  = "lifecycle - step 3"
  filename = "${path.module}/abc.txt"

  lifecycle {
    prevent_destroy = true
  }
}
abc.txt가 없는 상태에서는 잘 생성 됩니다
하지만 다시 수정 해서 진행 해보면
resource "local_file" "abc" {
  content  = "lifecycle - step 3-1"
  filename = "${path.module}/abc.txt"

  lifecycle {
    prevent_destroy = true
  }
}
다음과 같이 오류가 발생 합니다
즉 해당 파일에 수정사항이 발생하여 "삭제 후 생성" 을 하려고 하는데 삭제가 되지 않아 발생하는 문제 입니다
해당 옵션은 중요하고 변할일이 없는 리소스에 대해 설정해주면 좋을것 같다는 제 생각... (안쓸거 같지만)

다음으로는 인수값에 대해 조건식을 지정할수 있는데
precondition 옵션으로 인수값 검증을 진행 할수 있습니다.
variable "file_name" {
  default = "step0.txt"
}

resource "local_file" "abc" {
  content  = "lifecycle - step 6"
  filename = "${path.module}/${var.file_name}"

  lifecycle {
    precondition {
      condition     = var.file_name == "step6.txt"
      error_message = "file name is not \"step6.txt\""
    }
  }
}
실행 하지마자 빨갛게 반겨 줍니다...
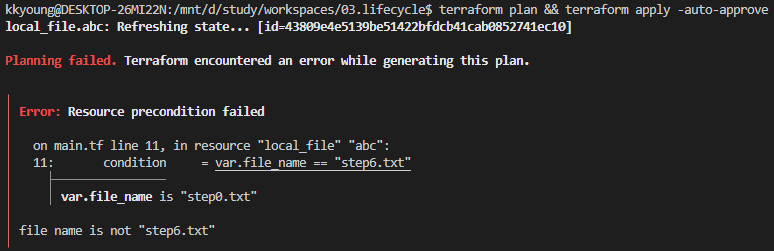
변수 값으로 file_name의 default 값은 step0.txt 이고
local_file.abc.filename은 file_name 변수값을 바라보고 있습니다
그리고 local_file.lifecycle.precondition.condition은 변수값인 file_name이 step6.txt 여야만 한다고 되어 있습니다
그러면 다음과 같이 변경하면 조건을 충족할수 있습니다

1주차 느낀점...
윤서울님의 경험담중 terraformer를 알게 되면서 그 동안 손으로 aws 구축하면서
"내가 구축 해놓은거 템플릿으로 뜰수 있으면 좋겠다" 생각을 많이 했는데
이게 돌고 돌아 테라폼 스터디에서 편리한 오픈소스가 있다는걸 알게되어 정말 좋았습니다
마지막 구축을 테라폼으로 진행하긴 했지만, 결국 하나의 사이트를 위한 구축이다 보니 범용성이 떨어지고
AWS Provider 문서만 보면서 코드를 짜 나가니 "테라폼을 쓰긴 하는데... 잘 하고 있는건가?" 에 대한 의문도 생기다 보니
스터디를 처음 참여 해보았는데 순차적으로 설명과 실습을 하다보니 부담없이 참여할수 있는것 같았습니다.
'공부하면서 > Terraform' 카테고리의 다른 글
| [T1012] 2주차 - 테라폼 기본 사용 2/3 (데이터 소스 + 실습) (0) | 2023.07.15 |
|---|---|
| [T1012] 2주차 - 테라폼 기본 사용 2/3 (입력변수) (0) | 2023.07.15 |
| [T1012] 1주차 - 테라폼 기본 사용 1/2 (환경구성) (0) | 2023.07.06 |
| [Terraform] tfenv - 유연한 Terraform 버전 관리 툴 (0) | 2023.07.04 |
| [Terraform] gaia (0) | 2022.12.22 |